Injection molding, like any other manufacturing method, has its own set of design requirements. Design engineers and medical molding companies who are familiar with these best practices have a better chance of creating parts and products that are both functional and aesthetically pleasing. As a result of injection molding, factories can produce parts in vast quantities. To make a part, molten material is injected into a previously created mold for making distinct components. The practice of making many copies of the same item is called “mass production.”
Thermoplastic and thermosetting plastics are the most common injection molding materials, but other materials such as glass, metal, elastomers, and confections can be used. The injection molding process starts with the mold’s creation. Major molds are typically made from aluminium or steel, metals that can be precisely machined to reproduce the features of the goods they are designed to make. The section below will highlight a complete guide about injection molding problems and solutions.
Common Injection molding Problems

Technical proficiency and meticulousness are essential for the mass manufacture of innovative components, as even the smallest of errors can have catastrophic financial consequences for businesses. Extremely good design is the key to avoiding such a situation. Some common injection molding defects and solutions that can develop in an injection-molded object are discussed in this article.
Flow lines
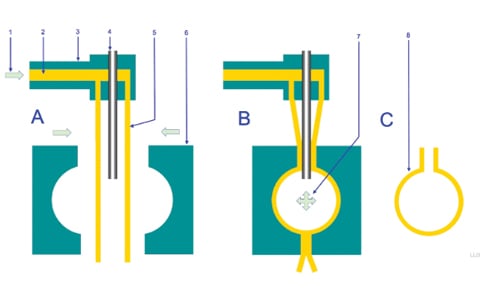
Flow lines are streaks, patterns, or lines—typically off-toned in colour—that appear on the prototype component due to the physical path and cooling profile of the molten plastic as it flows into the injection mold tooling chamber. The “gate” is the first piece of the injection molding tool that the plastic enters. The fluid then cools as it travels through the tool’s chamber, eventually hardening into a solid.
Causes
Flow lines occur when the molten plastic flows too slowly or too quickly around the mold’s internal curves and features. They also happen when the injection speed is excessively slow, leading to uneven solidification of the plastic, or when the plastic flows through portions with varied wall thickness.
Remedies
In order to ensure that the cavities are completely filled, it is necessary to increase the injection speeds and pressure to the appropriate level (while not allowing the molten plastic time to start cooling in the wrong spot). To prevent the flaw from occurring, either the molten plastic’s temperature or the mold’s temperature can be raised. Avoid rapid changes in direction and flow rate by rounding corners and places where the wall thickness changes. Put the gate in a spot in the hollow of the tool where the walls are especially thin.
Sink Marks
Shrinkage in the interior of the finished product causes small craters or depressions, known as sink marks, to appear on the outside surfaces of the injection molded prototype. Topographic sinkholes are reminiscent of this appearance.
Causes
When the plastic doesn’t cool and cures completely in the mold due to insufficient cooling time or cooling mechanism, sink marks form. They can also be brought on by an absence of gate pressure or by an increase in gate temperature. Injection molded parts with uniform wall thickness are just as likely to have sink marks wherever the thicker areas took longer to cool.
Remedies
To improve cooling and curing, mold temperatures should be reduced, holding pressure should be increased, and holding time should be lengthened. Faster cooling and less chance of sink marks can be achieved by reducing the thickness of the thickest wall portions.
Vacuum Voids
Pockets of air that are trapped inside or near the surface of an injection molded prototype are described as vacuum voids.
Causes
Uneven solidification between the surface and the interior sections of the prototype is a common cause of vacuum spaces. When the mold’s holding pressure isn’t high enough, molten plastic can’t be condensed properly, exacerbating the problem (and thereby forcing out air that would otherwise get trapped). Casting from a mold with misaligned halves can also cause voids in the finished product.
Remedies
Put the gate where the molding is thickest. Use a plastic with lower viscosity. Due to the increased velocity with which air may escape, this will result in less gas being trapped. Elevate the current level of holding force and lengthen the current period of holding.
Check for proper alignment of mold components.
Surface Delamination
Delamination of the surface occurs when a contaminant causes the part to develop thin layers on its surface. These laminated layers resemble coatings and can be easily removed by peeling.
Causes
Contaminants in the molten plastic cannot attach to the plastic, so they separate from the final product. Since they can’t bond, the prototype will be weaker and less attractive. The foreign substance is like a tiny crack inside the plastic. One such source of delamination is the excessive usage of mold-release agents.
Remedies
Make sure the plastic is completely dry before trying to form it. Raise the oven temperature of the mold. Avoid unexpected changes in melt flow by rounding off edges and sharp twists in the mold design. Spend additional time on the mold’s ejection mechanism to cut down on or get rid of mold-release agents altogether.
Weld lines
Weld lines are more of a plane than a line and form at the point where two streams of molten plastic from separate areas of the mold converge.
Causes
Poor bonding between two or more flow fronts during partial solidification of the molten plastic is the root cause of weld lines.
Remedies
Get the mold or plastic to melt hotter. Maximize the rate of injection. Make sure there is just one entry point by modifying the design. Use a different plastic, preferably one with a lower melting point and viscosity.
Short Shot
Short shots, as the name suggests, occur when a molding shot doesn’t quite reach the desired height. This happens when the molten plastic does not completely fill the mold’s cavity or cavities. Because of this injection molding small parts problem, the final product suffers.
Causes
Many different factors can result in inadequate shooting distances. If the shot or plasticizing capabilities are not properly calibrated, not enough plastic will be produced to fill the molds. A short shot may develop if the plastic is too thick to flow freely and fill all the cavities. Short shots can also be caused by insufficient degassing or gas venting methods, as this prevents trapped air from escaping and prevents plastic from filling the void.
Remedies
Choose a plastic with lower viscosity and increased flowability. The smallest, most inaccessible crevices can be filled with this plastic. Raise the temperature of the mold or the melt to enhance the material’s flowability. Plan for gas production by venting any built-up pressure inside the mold. If the maximum material feed of the molding machine has been reached, either the material feed must be increased or a different mechanism must be used.
Jetting

When molten plastic is injected too quickly, a phenomenon known as jetting occurs. With its fluid nature, the molten plastic solidifies into a state that displays the jet stream’s wavy folds on the injection molded component’s surface.
Causes
Most jetting is caused when the melt temperature is too low, which causes the plastic to become overly viscous and increases the resistance to flow as it is poured into the mold. Contact with the mold’s walls causes the plastic to cool off quickly and become more viscous. It’s likely that the material flowing through behind the viscous plastic will push it further, leading to scraping lines on the surface of the final product.
Remedies
Raise the temperatures used to mold and melt. In order to reduce the rate of injection, expanding the gate’s size is recommended. Better mold contact can be achieved with an optimised gate design.
Flash
The defect known as “flash” occurs when some of the molten plastic in the mold cavity escapes. The parting line or ejector pins are common means of egress. Affixed to the final product even after cooling, this extrusion serves no purpose other than to be there.
Causes
As a result of insufficient clamping force (a force strong enough to withstand the opposing forces generated by the molten plastic flowing through the mold), a flash can occur. The use of molds past their prime causes wear and tear, which increases the risk of a flash. The plastic may also escape via the path of least resistance if the injection pressure is too high.
Remedies
To keep the mold halves together during shots, the medical plastic manufacturer needs to crank up the clamp pressure. Be sure to keep up with regular mold maintenance and cleaning. Optimize the injection speed, injection pressure, mold temperature, and gas venting to achieve the best possible mold.
It is usually inexperienced workers or those who lack the proper equipment that is to blame for any mishaps that occur. However, personnel with adequate experience and the appropriate mix of hardware and software are brimming with inventive solutions and originality. The most crucial step is assembling a group of people who have the necessary skills and experience.
Troubleshooting Tips For Plastic Injection Molding

The injection mold troubleshooting guide has been mentioned below:
Inspect the complete mechanism and operation
Before focusing on plastic injection molding defects and solutions, like sink marks, it’s important to check for any additional injection molding flaws by looking at the item from every angle. The presence of additional problems, when taken into account as evidence of a process issue, can help in eliminating certain root causes and narrow the culprit faster.
Review the documentation
When thorough documentation of injection molding troubleshooting is kept throughout a process, it can help answer many potential questions about a problem in advance. In a perfect world, paperwork would head off problems before they even arise. In order to offer as much information as possible for the future, it is important to keep detailed records of any process changes done to address a molding issue. The opposite is true when initiating a new procedure; always go to the documentation for guidance.
Don’t forget to account for the machine’s outputs
When debugging a machine, it’s crucial to not just record the inputs but also the outputs. As a result, anyone else consulting the injection mold troubleshooting documentation will gain a clearer understanding of how the standard process inputs actually performed (in comparison to the expected results) and how they affected the quality of the final products. Second-stage packing time, screw recovery time, cooling time, and completed component weight are all important outputs to record in the injection molding troubleshooting guide.
Consider process relationships
When trying to figure out what’s wrong, one might try isolating individual processes and the injection molding tool design. However, when doing so, it’s important to keep in mind the hidden or interacting impacts that changing (or removing) one process might have on another. When diagnosing or implementing a solution, it’s helpful to keep in mind the old adage that “nothing happens in a vacuum,” meaning that if an individual changes one part of the process, it will probably have a domino effect on 10 (or more) other parts. As a result, tweaking and injection molding troubleshooting documentation take on greater significance here.
Conclusion
Injection molding presents numerous opportunities for costly mistakes, accompanied by some molding defects and solutions. Subtle surface flaws are often the least of an injection-molded product’s worries, but there are other, more serious difficulties that might compromise the product’s reliability, durability, and usefulness. Issues with the molding process, the material, the tooling design, or all three might contribute to these defects.
Knowing the root cause of the injection molding problem is crucial for solving this and other quality issues. Knowing the most frequent molding flaws and how to prevent them can help importers and manufacturers of injection-molded items save money on scrap and returns.
Injection molding is a common manufacturing method, but it often necessitates a hefty initial investment in tooling. Because of this, it is crucial to get the mold design perfect the first time around, rather than having to start again after discovering major faults. The molding process or material defects are typically less difficult and cheaper to remedy. However, mold issues can be extremely costly to fix, regardless of the source. But SeaSkyMedical could help solve these problems well, feel free to contact us.